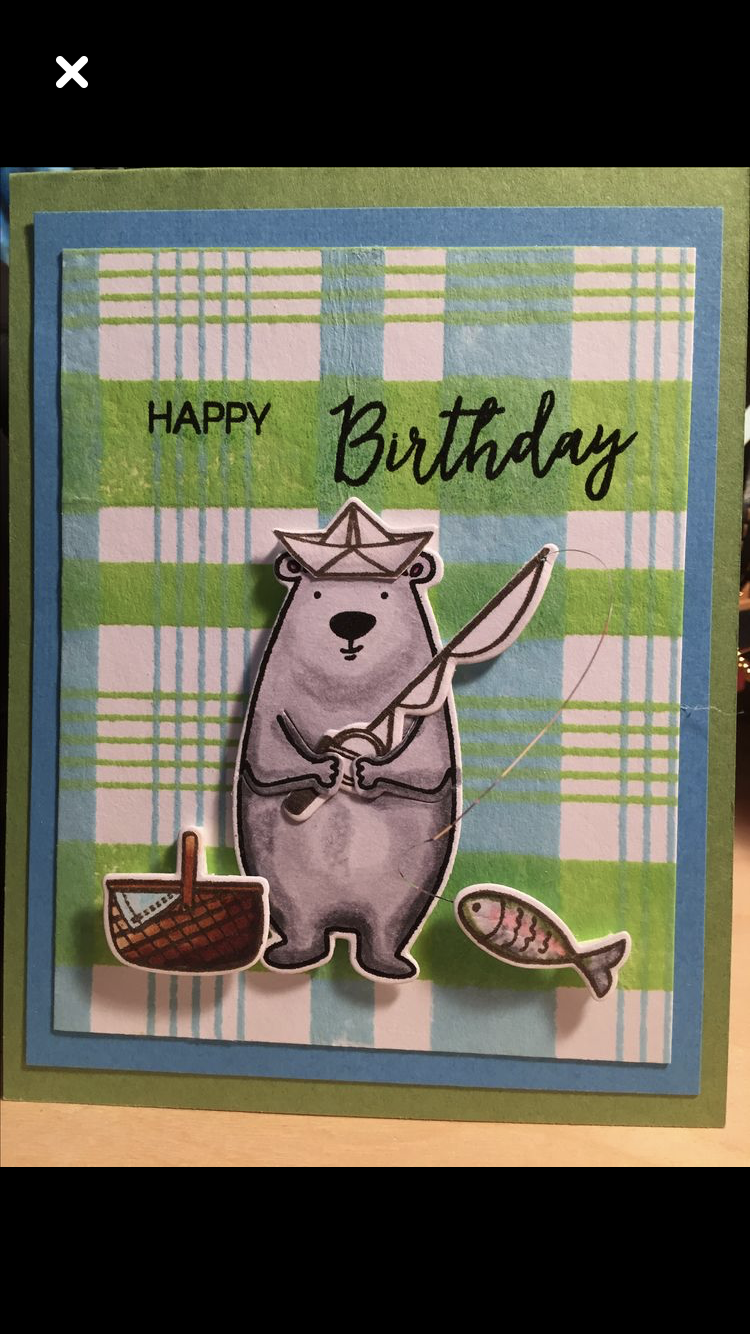
I haven’t posted anything or done a challenge in a really long time, but I recently got the Altenew Bold Alphabet dies. I was really anxious to try them. So I paired those with Julie Ebersoles’s adorable So Matcha set from Essentials by Ellen (which are just so much fun and easy to Copic color!) I used Distress Oxides to make the background, and Pretty Pink Posh sequins for both inside the shaker and for embellishment. I cut out the 2” and the “U” with my Cricut. I hope the recipient enjoys this card as much as I enjoyed making it! 😊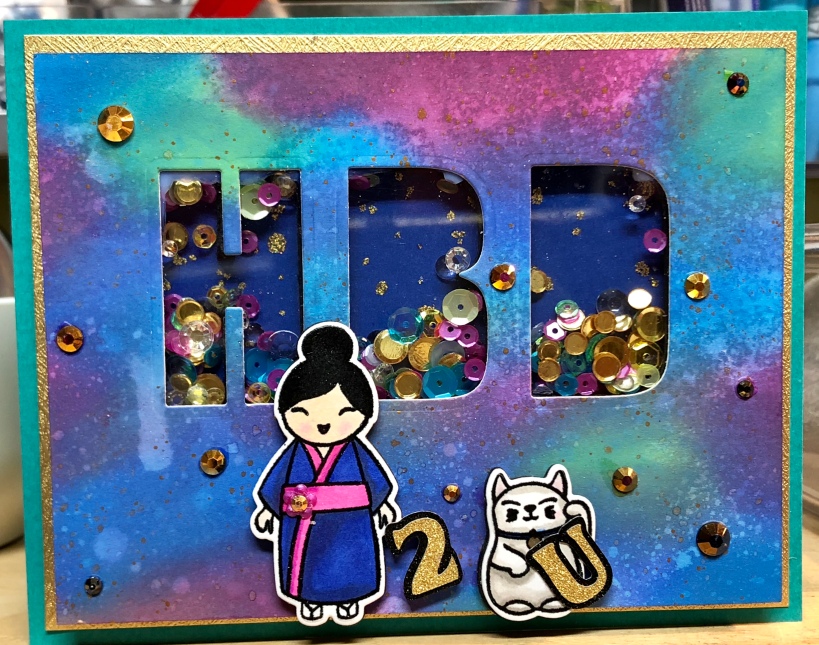
Favorite Essentials by Ellen Set
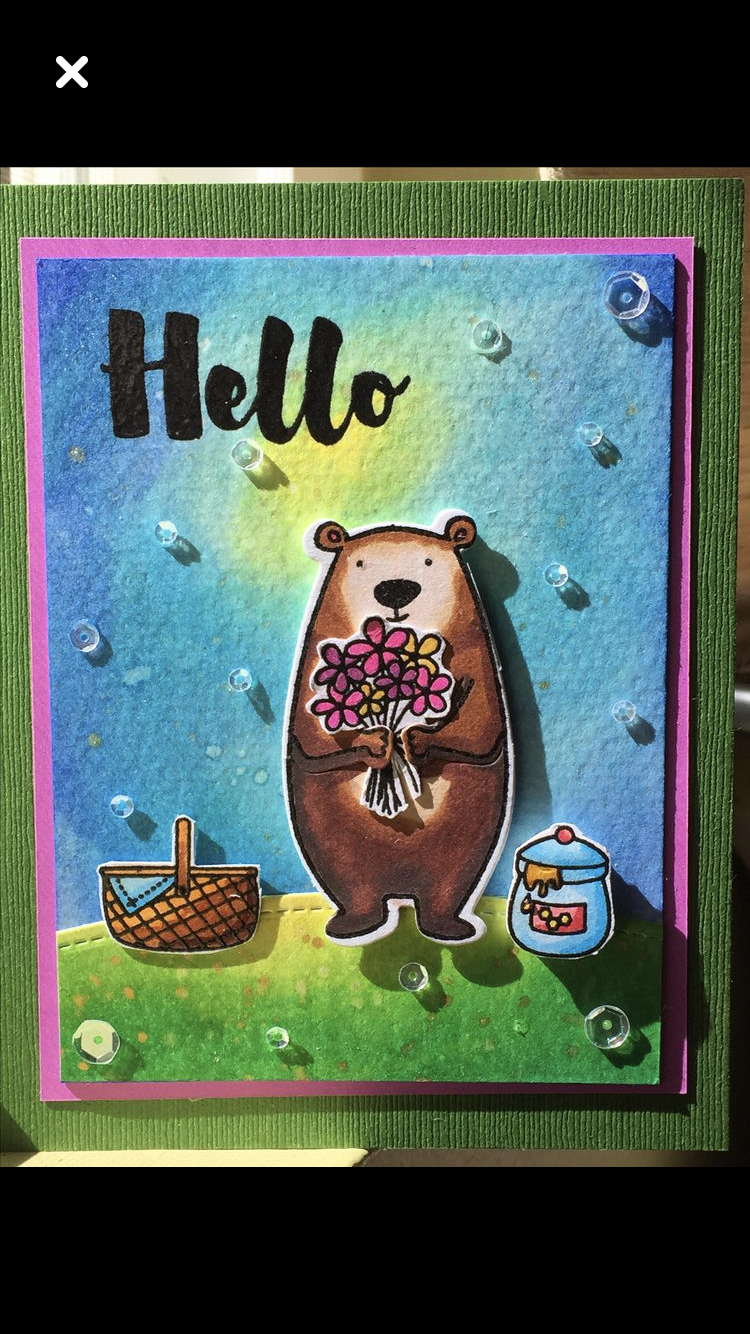 Ellen Hutson is asking its customers what their favorite Essentials by Ellen set is. Hands down, my absolute favorite set is Julie Ebersole’s ingenuous “All Inside” with the ever adorable and ridiculously versatile bear! Just about everyone who is close to me has been the recipient of a card with the said bear prominently displayed! I was beyond ecstatic when the “Bear Wear” set made its debut. That just took the bear to a whole new level! Love this bear, he’s so darn cute!!
Ellen Hutson Mix it Up Challenge
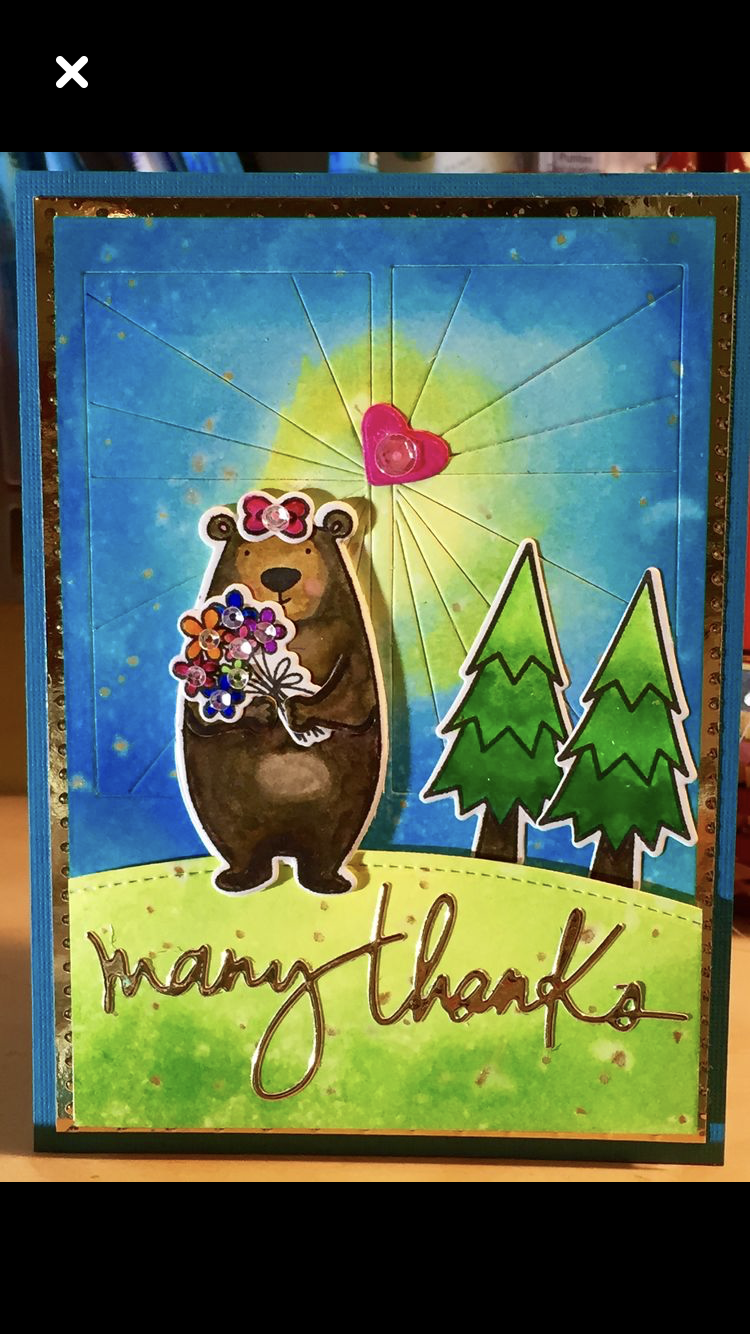
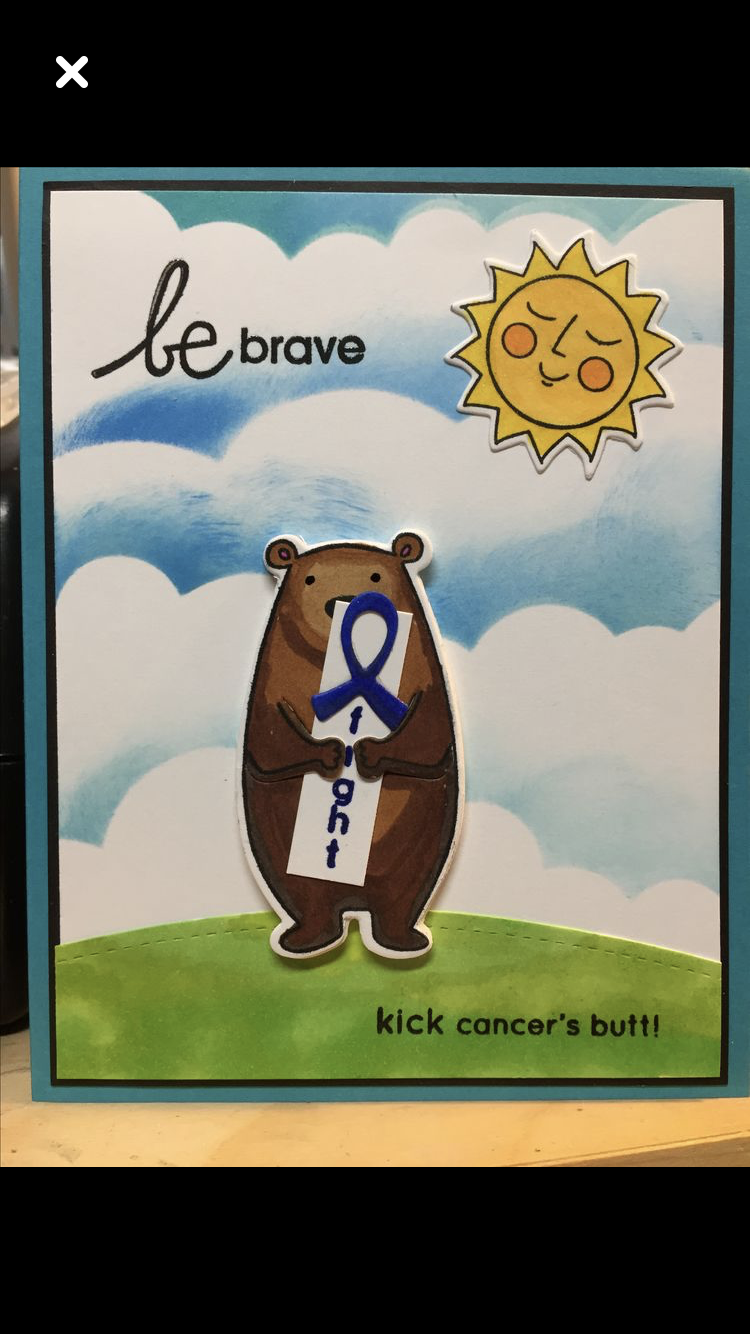
Ellen Hutson Mix it Up Challenge with Ellen Hutson Courage Stamp and Die Set and Pretty Pink Posh Bold Blooms Stamp and Die set, Pretty Pink Posh 4 mm clear sequins and Copic coloring. 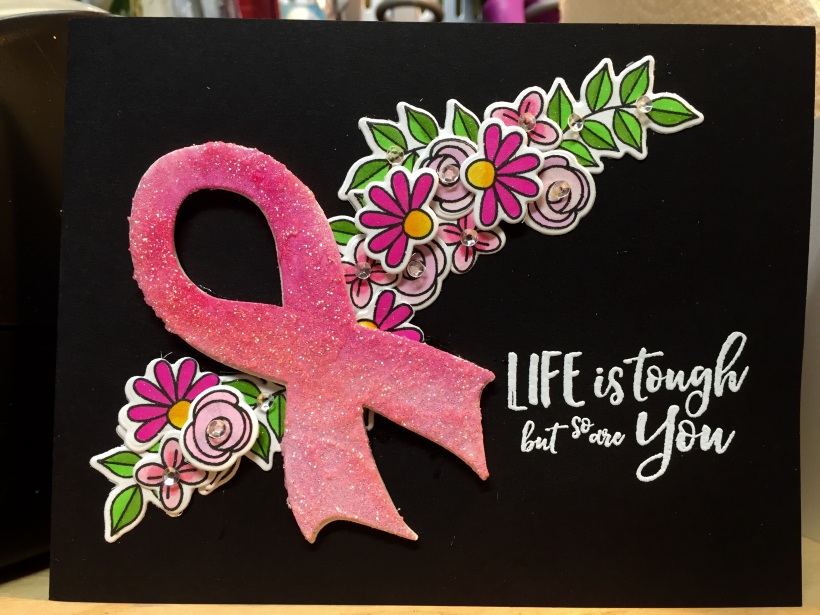
Ellen Hutson Pin-Sights Challenge


I had to make a quick card for a niece who is graduating from middle school and Ellen Hutson is having a Pin Sights Challenge–perfect opportunity to do both! I prefer more saturated, vibrant colors, though, so my color palette reflects that (plus I do not have any pastel card stock in my stash, lol!)
I stamped a piece of Canson water color paper with Ellen Hutson’s Wonky Backdrops stamp using Versamark ink and heat embossed with WOW Metallic Gold Rich Pale Super Fine embossing powder. Once it cooled, I applied Distress Inks Picked Raspberry and Abandoned Coral directly over the panel. I set that aside to dry.
I stamped the butterfly, flower, deer and bunny with My Favorite Things Hybrid Ink in Hot Fudge. I Copic colored the bunny with RV10, N0 and N2. The deer was colored with RV10, E37, E79, E23 and E51. I used B24 and B29 to color the butterfly and RV06, RV17 and YG06.
I cut the bunny and deer from fun foam which I adhered to them. I put a piece of Stick It on a 1 1/2″ x 3 1/4″ piece of fun foam, adhered it to blue card stock and die cut the “congrats” from Ellen Hutson’s Zipper Panel die set. I also die cut the smaller Pretty Pink Posh scallop circle from gold card stock. I liberally applied a couple of coats of Wink of Stella to the “Congrats”, the butterfly, the flower and the cheeks and ears of the deer and bunny. I used a black gel pen on the eyes and nose of the deer and bunny, and I used a white gel pen on the deer’s spots and the bunny’s tail.
To assemble the card: 4 1/4″ x 11″ raspberry card stock, side folding card for the base. The Wonky background adhered with ATG tape, the gold scalloped circle and butterfly were afixed with Ranger Matte Medium, the deer, bunny and sentiment glued in place with iCraft Mixed Media adhesive. And then Pretty Pink Posh clear sequins and clear confetti placed with Matte Medium.
This card was a lot of fun to make; I hope its recipient enjoys it too! Thank you so much for stopping by!
Ellen Hutson Mix It Up Challenge with Reverse Confetti
 I recently discovered the Reverse Confetti brand when I was looking for sentiments to make some Easter cards. I loved the fonts, and the sentiments really stood out because they were so unique and different from anything else I have seen out there.
I made this particular card for a dear friend for Mother’s Day; she is one of the most giving and generous people I know. She really just shines so brightly, and I wanted it to be an extra special card for her.
I started out making my background with 3 3/4″ x 5″ watercolor paper die cut with Pretty Pink Posh Stitched Notes rectangular die. I used an anti-static tool and stamped the sentiment from Reverse Confetti’s My Rock clear stamp set with Versamark ink and Detailed White embossing powder from Stampendous. I used a combo of Distress Inks and Distress Oxides–I love the creaminess and blendability of the Oxides, but I wanted the vibrancy of the regular inks. Distress Inks used were: Squeezed Lemonade; Picked Raspberry; Carved Pumpkin and Abandoned Coral. Distress Oxides used were: Spiced Marmalade and Worn Lipstick. I then squirted the paper with a spray bottle, let it sit for 30 seconds then blotted with a paper towel. I then flicked with Gansai Tambi starry colors red gold water color paint.
I made the waves using Wplus9 Wave Border Die with Canson water color paper. Again I colored with a combo of Distress inks: (Tumbled Glass; Salty Ocean and Mermaid Lagoon) and Distress Oxides: Broken China and Faded Jeans.
The otter and starfish were stamped with My Favorite Things Hybrid ink in Hot Fudge from Ellen Hutson’s Otterly Awesome stamp set on Bristol Smooth cardstock. I colored the otter with Copic markers: E79; E29; E37; E23; E11; E00 and RV10. The starfish was colored with YR07, YR04 and Y11. I applied clear Wink of Stella on the otter’s feet, nose, tongue and ears as well as the starfish.
I cut an otter and a wave from craft foam with their respective dies and adhered them to the otter and the wave to add dimension. I embellished with pretty Pink Posh Clear Confetti mix, a stack of sequins of varying sizes on the starfish and a 3mm sparkling clear sequin using Ranger Matte Medium to adhere.
I die cut a piece of 4″ x 5 1/4″ gold metallic card stock with PPP Stitched notes die and an A2 sized card base from hot pink card stock. I adhered the background to the card base using an ATG.
This was a really fun card to make, and its recipient called me yesterday to say how much she loved it. Such a small thing to make someone you appreciate a card! Happy Mother’s Day to you all!
Ellen Hutson Pin-Sights Challenge!


The awesome people at Ellen Hutson are having another Pin-Sights Challenge. They do one every month, and the only requirements are that you use one Ellen Hutson product and let your creativity fly off the springboard of the Pinterest Inspiration pic posted. Tons of fun and easy peasy–no stress either since it is a random drawing for a $50 Ellen Hutson gift certificate.
I loved the greens and golds in the Inspiration Picture; they are what really spoke to me. I was also super excited to break out some of my newest toys to create my card (which I made for a friend who is having surgery soon).
I started off with a 4 1/4″ x 5 1/2″ piece of textured, shimmery gold card stock, which I die cut with Pretty Pink Posh’s new Stitched Notes die. I then laid the inner detail wing dies from Concord and 9th’s newer Butterfly Card die set as close together as possible and ran that through my die cutter. I applied Stick it to a piece of black card stock and cut the wings with the larger outer wing dies from the same set. I then laid the inner detail dies on the black card stock wings and ran that through my die cutter. I trimmed off the stray pieces of card stock and applied liberal amounts of clear Wink of Stella on each of the detailed wing pieces. Then I removed the adhesive backing from the Stick It and carefully laid the detailed black wings over the detailed gold wings on the gold panel.
I cut a piece of Bristol Smooth ️️paper into a rectangle slightly smaller than 3 1/2″ x 5″. I traced around the larger butterfly outer dies lightly with a pencil so I had a guide for coloring the butterfly. For the upper two wings, I used Copic G02 (Spectrum Green) and G17 (Forest Green) to color the two upper wings and G02 (Spectrum Green) and G00 (Jade Green) to color the lower wings. I applied Wink of Stella generously to the wings. I secured the gold panel on top of the Bristol smooth panel with my ATG. I cut out the body of the butterfly from a piece of black card stock with Stick It and a piece of black craft foam with Stick It. I adhered the cardstock body on the foam body and liberally applied Wink of Stella to the butterfly’s body. I removed the adhesive backing from the craft foam and attached it to the butterfly.
I ran a piece of 4″ x 5 1/4″ black card stock through my die cutter with the Pretty Pink Posh Stictched Notes rectangle, and I adhered it to a piece of green card stock with tape runner. Then I adhesed the gold panel inside that with ATG. I cut a strip of black card stock and stamped it with the “Thinking of You” sentiment from Ellen Hutson’s Mondo Hydrangea. I just love that font! I finished the card off with one of each size of Pretty Pink Posh’s new Sparkling Clear Confetti mix.
I’m really happy with how this card turned out, and it was a lot of fun to make! There are so many great new products out there, it’s hard not to want them all!
Thank you for stopping by!
Hodge Podge of Cards


Since breaking out of my crafting slump, I’m finding I only want to make cards. Between the awful weather we’ve been having, buying some fun new products and being reinvigorated, I have a whole new zeal to spend time in my craft room. Here are some of the cards that have helped power me out of my crafting doldrums. I included some crepe paper flowers I made for a bridal shower gift.
Ellen Hutson Mix it Up Challenge!
 Ellen Hutson is having another fun Mix it Up Challenge featuring their products combined with Paper Smooches that runs until March 14th. The winner will receive a $50 gift certificate to Ellen Hutson. (I need to give a shout out to Ellen Hutson here for having 2 contests every month that give everyone a chance to win a very generous prize!)
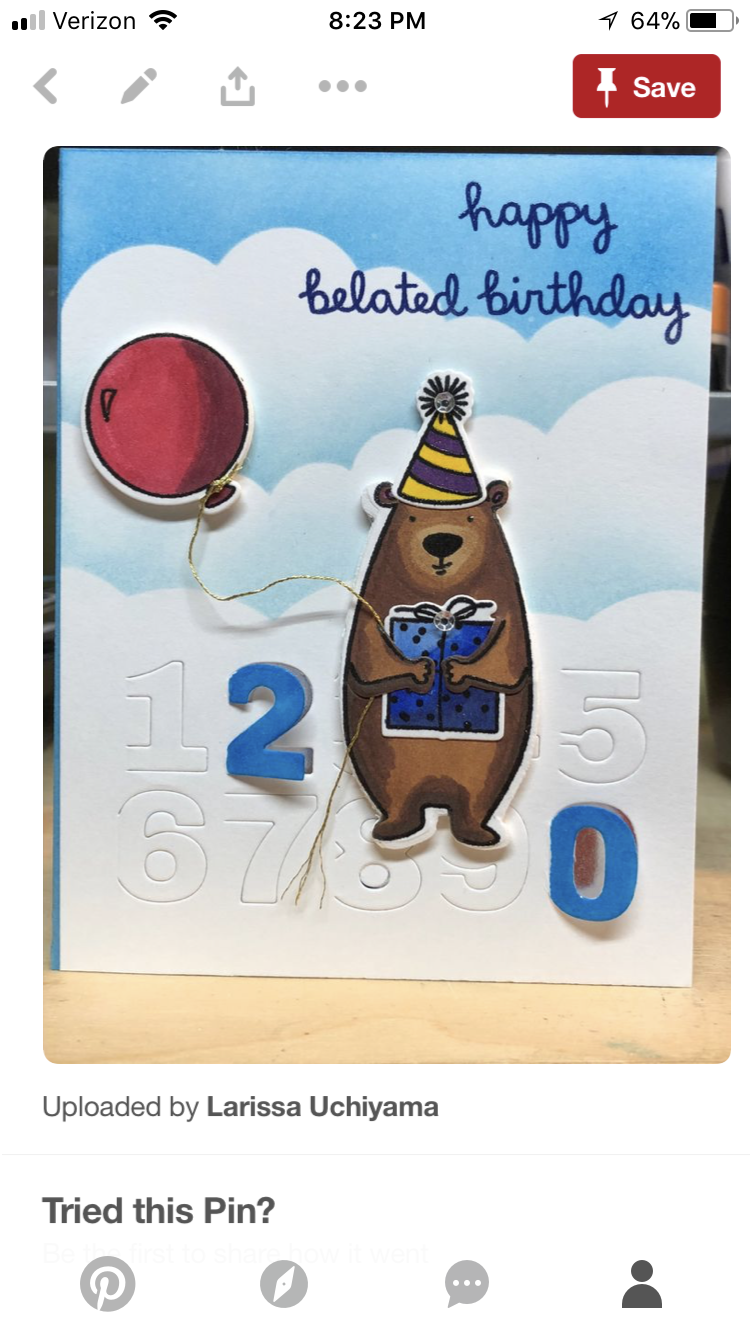
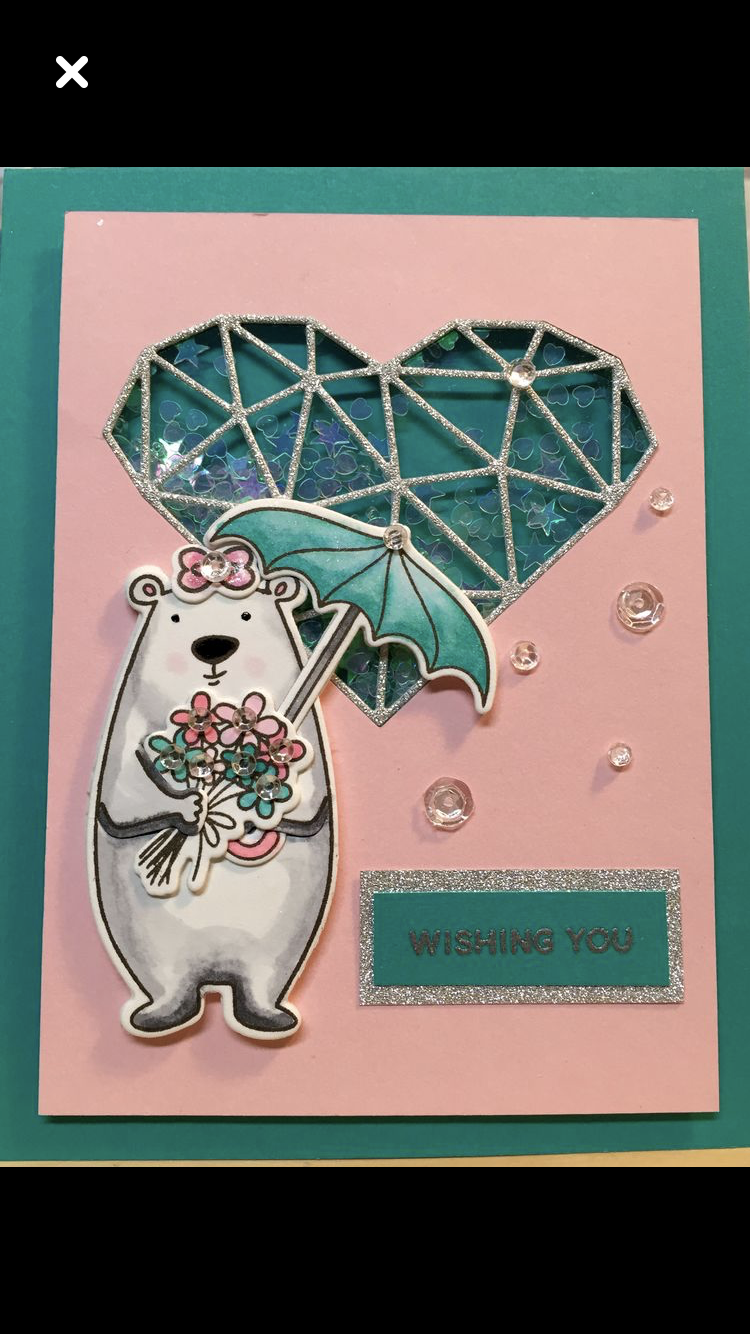
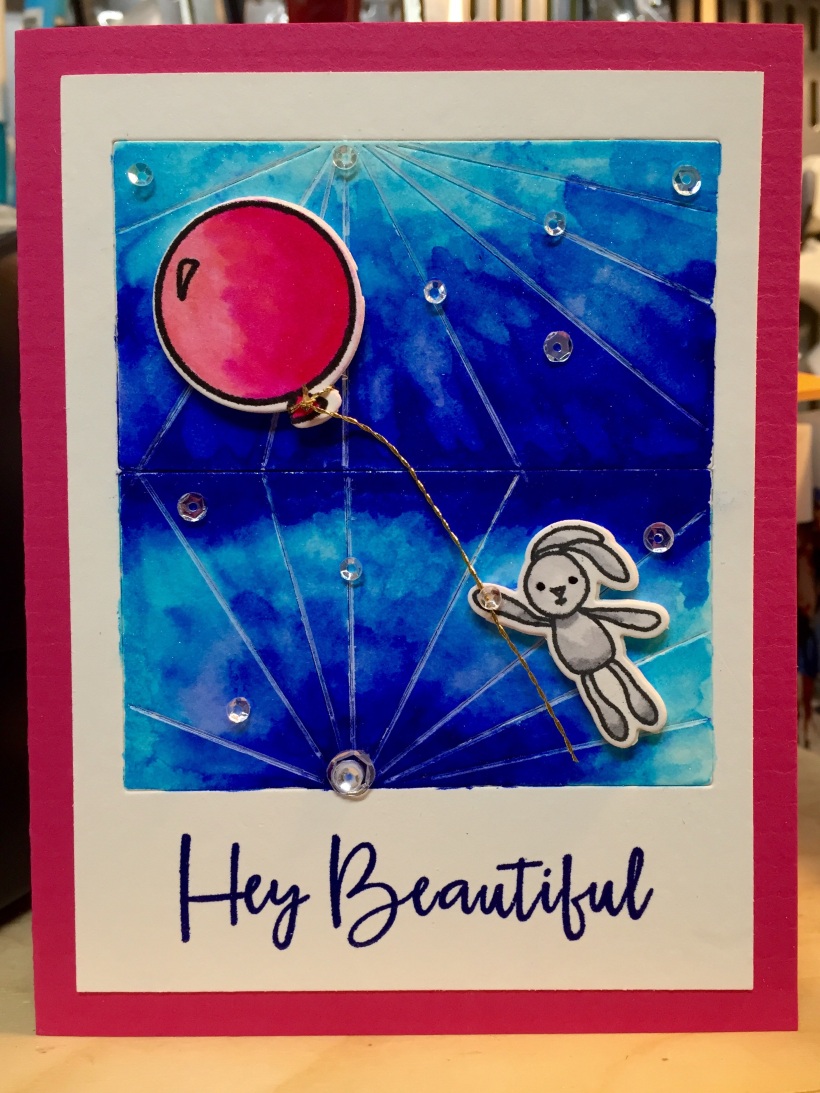
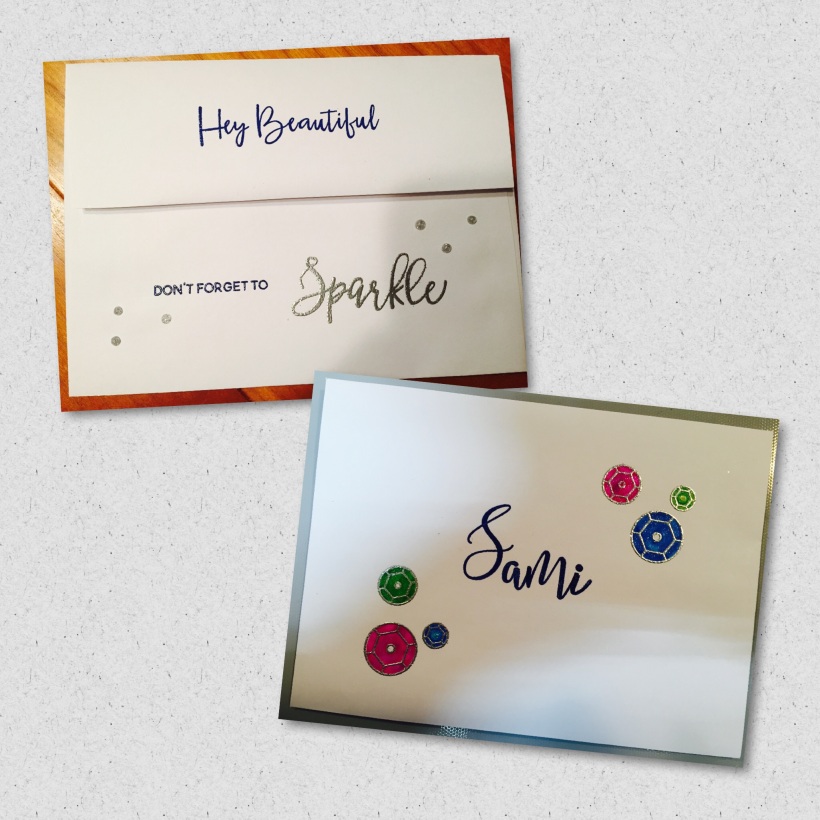
I took a 3 3/4″ x 5″ piece of Canson cold pressed water color paper and ran it through the Essentials by Ellen Silver Linings die. Each die was turned the opposite way it’s normally used. I was aiming for a diamond/gem faceted look–which as you can see didn’t turn out the way I expected once I colored it, but you have to keep moving forward. I was able to rescue it from myself, but it appears more tie-dyed in appearance. So this card is more hippy-dippy than classy and elegant, lol! (Maybe I should draw a peace sign on the balloon and put a headband on the bunny, haha!)
I masked off the 4 sides of the die cut image with Post It Notes then colored the “facets” of the background with Zig Clean Color Real brush markers using 030 Blue, 030 Cornflower, 032 Persian Blue, and 030 Cobalt. I used water to blend and blotted with a dry paper towel. After it was dry, I shellacked it with Clear Wink of Stella. When that dried, I went over the score lines with a white gel pen (since some of them lost visibility when I colored them in with the markers and removed the Post It Notes..
I stamped the balloon and the bunny from Essentials by Ellen Bear Ware stamp set and cut them out as well as white craft foam (that had Stick It on both sides) with their coordinating dies. Zig colors for the balloon are: 025 Pink, 028 Pale Pink and 026 Light Pink. I shellacked the balloon in Clear Wink of Stella and adhered the craft foam balloon to the back.. I colored the bunny with Copic Markers N0, N2, and N4 and adhered the craft foam bunny to the back. He is the matte focal point, lol! (I have a horrible addiction to Wink of Stella and sequins. I need a 12 Step program for my bling addiction–no card goes unscathed!)
I stamped the sentiment from Paper Smooches Fun and Flirty set in Majestic Blue Versafine ink and heat embossed it with clear embossing powder. This is such a fun set with upbeat messages, and I love the fonts! I adhered the card front to a piece of 8 1/2 x 5 1/2 pink card stock.
I tied a piece of gold cord to the balloon and adhered the balloon to the card front (putting a dot of Ranger Matte Medium on the knot of the cord to hopefully prevent it from coming unknotted). I adhered the bunny to the card front and glued the end of the cord to his hand with Ranger Matte Medium, placing a 3 mm sequin on top. I finished the card with 3, 4, and 6 mm. clear sequins from Pretty Pink Posh which I glued on with Ranger Matte Medium (I need to buy this stuff by the gallon, it is my go to adhesive when I don’t use tape of any kind).
Thank you for stopping by my humble blog and sharing my misadventures in card making yet again! 🙂
Thank God for not so little girls! (And how to save a card from yourself!)

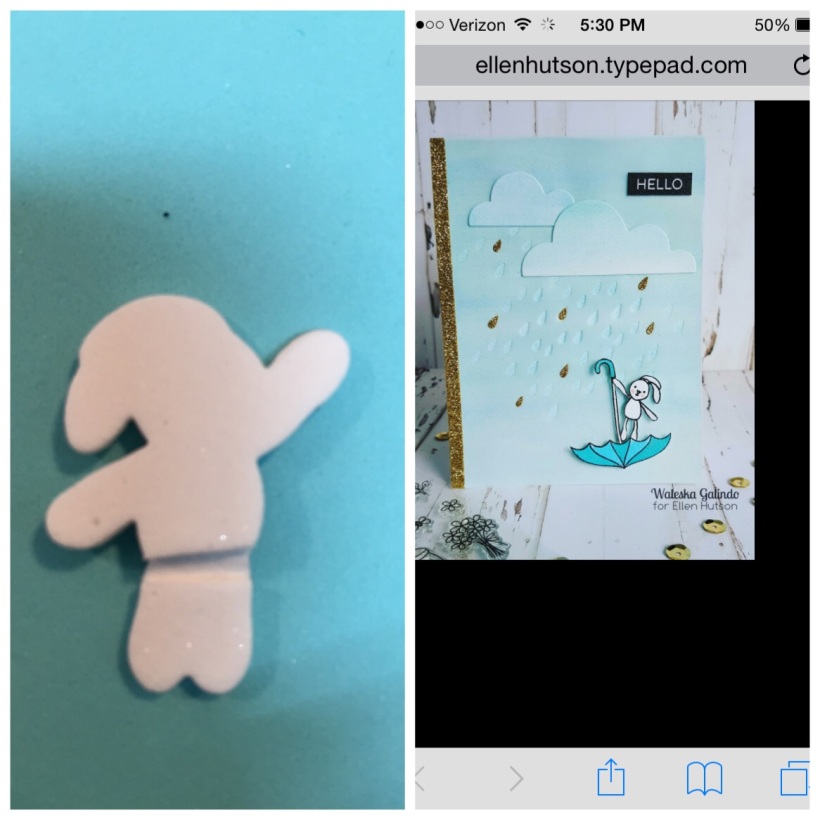
As I mentioned in my last post, I’ve been in the worst card making slump! I’m still struggling with post-Christmas crafting blahs. Fortunately, I have several nieces who have birthdays at opportune times. Feeling drained of all creativity and tired of staring at Elfa wall shelving, I turned to one of my favorite go to craft supply websites, Ellenhutson.com and their always inspiring “The Classroom”. Lucky for me, there was a new Pin-Sights Challenge!
And score, there was a beautiful inspiration card by Waleska Galindo in tranquil, soft aqua tones! It was exactly what I needed to get me going! I shamelessly ripped off her card but with a couple of my own signature touches–hello Wink of Stella and clear sequins!
I actually made my waves first, but in retrospect, I should have done the background first (although, doing the waves first led to a happy accident I will explain later). I will tell you how I made my card, but don’t do as I say, ok?
I took two pieces of Canson cold pressed water color paper, 4″ x 2 1/2″ and 4″ x 1 3/4″ and cut them out using WPlus9 Design Studio Wave Border die. I then put Stick it on both sides of a piece of 4 x 1 1/2″ aqua craft foam and die cut it out to match the shorter wave. I applied Tumbled Glass distress ink directly to the upper part of each wave, then blended it in with a sponge blending tool and ran it under my heat gun. Then I applied Peacock Feathers Distress Ink directly to the lower portion of the waves then blended them upwards with the sponge blending tool. I spritzed both pieces with water, let sit for 30-60 seconds then placed a paper towel directly on them. I repeated this twice being sure the Peacock Feathers was a deep, saturated color. Then I took a wet paintbrush and flicked Kuretake Gansi Tambi Starry Colors in White Gold on them, and used it to lightly paint the tops of the waves. After the shorter wave was thoroughly dry, I adhered the craft foam to the back of it.
I then went about making my background (which honestly, I should have done first, lol!) I used a piece of 4″ x 5″ Canson water color paper and applied Salty Ocean, Broken China, Peacock Feathers, and Mermaid Lagoon direct to paper and used blending tools as described above. I was absolutely horrified to discover that there was almost no differentiation between the sky and the sea! What to do; how can I salvage this card? In desperation, I spritzed a bunch of water on the background, let it sit for a minute then sponged it off with a dry paper towel. I tried to lift up as much color as possible. I cut out cloud masks with Pretty Pink Posh rainy day dies from full adhesive Post-it Notes to create masks. I laid them on the background and applied more distress ink with the sponge blending tools. Peeling off the masks, I was relieved that the clouds magically transformed the monolithic surface and added texture and lightness.
I stamped the bunny, umbrella, present and flowers from Ellen Hutson’s Essentials by Ellen Bear Ware stamp set with My Favorite Things Hybrid Ink in Hot Fudge on Canson water color paper. I then colored them with Copic markers. Flowers: B39, RV52, and RB17. Bunny: N0,N2, N4. Present: BG18, BG53, BG000, BG78 and BG72. Umbrella: BG13, BG15, BG000, BG53 and N6. Then I shellacked them all with Wink of Stella and cut them out with their coordinating dies. I also die cut the bunny and the umbrella out of a piece of white craft foam that had Stick It on both sides. I adhered the umbrella piece to the back of the umbrella. I cut the bunny shaped foam right under the belly. and cut off the top part of its legs. I scored the bunny at the bottom of his belly, and at what I imagined were his knees and folded it so he could be in a sitting position. I adhered the foam to the bunny.
I assembled the card by determining placement of the floating bouquet under the taller wave. I glued the bouquet down with Ranger Matte Medium, and then glued the taller wave on top. I positioned the shorter wave so the present nestled under it. I glued the present with Matte Medium then adhered the shorter wave on top. I played around a little until I was satisfied with the angle and location of the umbrella and adhered that over the shorter wave. I seated the bunny on top of the umbrella and secured him down. Final touches were Avery Elle’s Sentimental stamp set’s “Happy Birthday” stamped in Majestic Blue Versafine Ink with clear embossing powder (again, in retrospect, I should have done this earlier and used my stamp positioning tool–I was lucky that it stamped ok using just an acrylic block and didn’t need to be restamped). I also used 3 and 4 mm clear sequins from Pretty Pink Posh as well as a half inch “14” that I cut out of silver sparkle paper (my niece is turning 14) using my Cricut and the Extreme Fonts cartridge (Junior font).
I mounted the card front to a 4 1/4″ x 5 1/4″ piece of teal card stock and adhered that onto a 4 1/2″ x 5 1/2″ pool card base.
I also decorated an A-6 envelope (this card is too big and too fat for an A-4) with Ellen Hutson’s Essentials by Ellen Spread The Sparkle Stamp set, Copic markers, Wink of Stella Nuvo Drops,a sentiment from Paper Smooches Fun and Flirty stamp set and letters stamped from Concord and 9th Sophisticated Scripts sets.!
(I meant to put the inspiration pic from the Pin Sight Challenge up top, but I was unable to execute that! D’oh!) One of these days, I will get this blogging thing down, lol! Maybe… Thank you for visiting my very humble blog! 🙂
It’s Been A While…
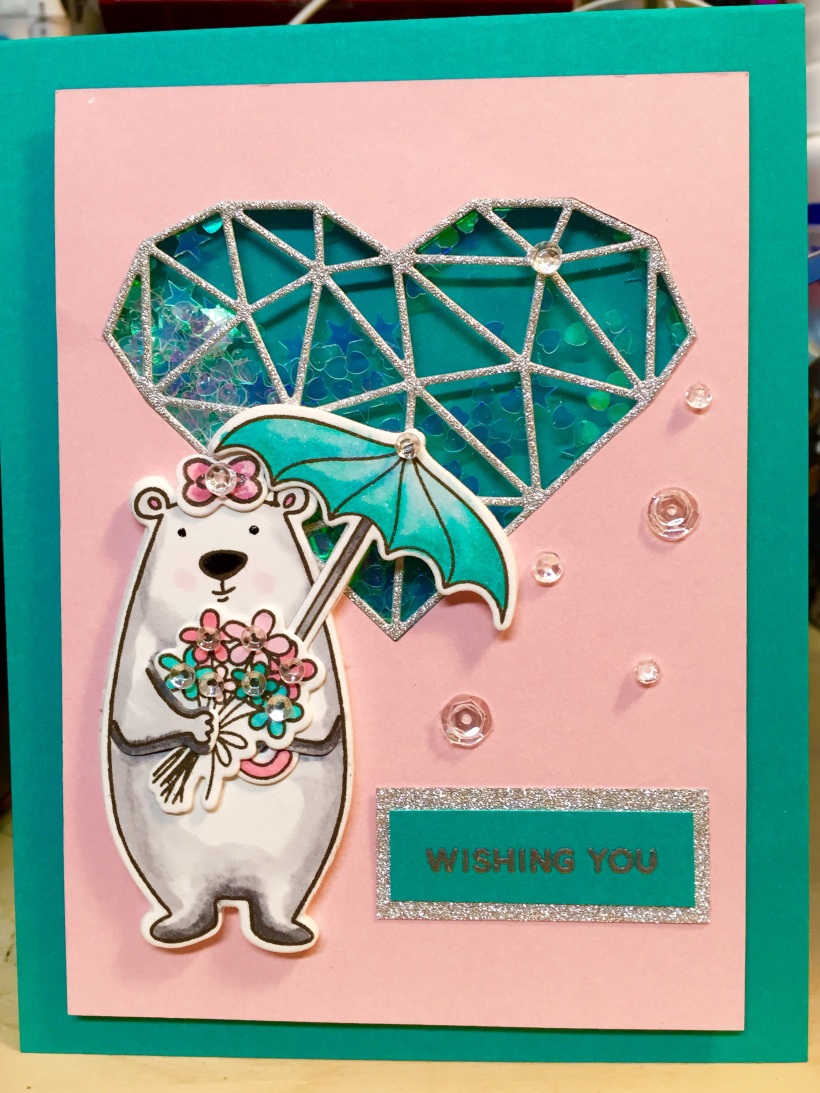 After surviving the Holidays and the rigors of making almost 100 Christmas and Hanukkah cards, my right brain shriveled up into the fetal position and curled into a quiet, dark corner of my square head. It was rudely awakened by me: “Hello, hello, anyone in there? We need to make a bridal shower card!” It slowly unfurled, somnolent and sclerotic, stretched and yawned. I laid out pieces of card stock in the wedding colors of the bride to be. It just sat and stared; I just sat and stared. Nothing, nothing, nothing. Finally out of desperation, I reluctantly pulled out the Ellen Hutson All Inside stamp set. I say reluctantly because I use it time after time whenever I get Crafter’s Block. It has saved me repeatedly, though. I tried to resist, but I had no choice. It was time to break out the big guns!
First I cut out the Bear using the coordinating die from Canson watercolor paper. I have found that cutting the bear out first and then stamping the image directly on top works out best for me. When I stamp it first and then try to cut it out, I have on many occasions, amputated some part of the bear–foot, ear, etc. I prefer being a competent crafter as opposed to an inept surgeon. I taped it on the back with Micropore tape to my homemade stamping tool that resembles one that rhymes with “listy”, stamped it, the bouquet of flowers and umbrella from Ellen Hutsons Bear Wear and the bow from Pretty Pink Posh Holiday Pals all on Canson watercolor paper using My Favorite Things Hybrid Ink in Hot Fudge. I then cut out the other images using their coordinating dies.
I colored the images with the following Copic Sketch markers: N0, N2, N4 and N6 for the bear with RV10 for the rosy cheeks and inside of the ears; BG13, BG15, RV10 and RV13 for the flowers; RV10 and RV13 for the bow; BG 13, BG15, and BG 18 for the umbrella with N2 and N4 for the handle. I used a colorless marker to blend and then shellacked everything (except the bear) with a coat or two of clear Wink of Stella. I used a black gel pen on the bear’s eyes and nose.
I cut a piece of pink card stock into a 5″ x 3 3/4″ rectangle, then cut out the heart using My Favorite Things Abstract Heart Die, punching out the entire piece. I cut out a piece of craft foam, slightly smaller than 5″ x 3 3/4″, lined up the pink piece of card stock with it, and lightly traced where the heart die should be placed to cut out the foam. I adhered a piece of Stick It to both sides of the craft foam, and die cut the Abstract heart, punching out the entire piece. I adhered a piece of Stick it to a piece of silver sparkle card stock and used the same die to cut out the intricate, abstract heart, punching out all the empty spaces. I set that aside. I cut a 4 1/4″ x 5 1/2″ piece of teal card stock and folded that in half to be a top folding card. I cut out a piece of Judikins Window Plastic slightly smaller than 5″ x 3 3/4″, which I adhered to the back of the pink piece of cardstock using Ranger Wonder Tape. I peeled off one side of the Stick It paper and adhered the craft foam to the back of the window plastic , being careful to get the hearts aligned.
I wiped the plastic part of the heart with a powder anti-static tool and then wiped that out with a Swiffer cloth. I wiped the teal card base with a powder tool and then wiped it with a Swiffer cloth. I then placed a heap of clear seed beads, Iridescent 1/4″ Star confetti, Mini Star and Mini Heart Confetti from Pretty Pink Posh on the upper center of the teal card base. I peeled off the Stick it from the piece of foam, and gently lowered it on to the teal card base, being mindful not to allow the confetti or beads to roll out of place. The Stick It is repositionable, however, the confetti and beads can get dislodged, if you reposition it. Use caution here!
I stamped my greeting from Pretty Pink Posh Rainy Days “Wishing You” on a small rectangle of teal cardstock with Versamark ink, embossed with silver embossing powder, and used a slightly larger piece of silver glitter card stock to frame it. I stamped the inside of the card with Pretty Pink Posh Rainy Days “Showers of Blessings” with Versamark ink and embossed with silver embossing powder. I adhered the framed greeting onto the cardstock using my ATG gun. I also die cut a bear and an umbrella using the coordinating dies from craft foam with stick it on both sides. I adhered one side of each (had to cut out parts of the umbrella so it didn’t infringe on the bear) and then secured them to the card base.
I then took the silver sparkle abstract heart I had cut out earlier, peeled off the backing of the Stick It paper and centered it over the window plastic. I embellished the card using sequins of varying sizes and seed beads from pretty pink posh, adhering them with Ranger Matte Medium glue. I also glued sequins to the flowers and umbrella. Overall, I was pretty pleased with my right brain’s first foray into the new year. And even happier still, when my left brain tapped me on the shoulder and said: “Hey, dummy! Look, you used an Ellen Hutson product. You used colors from the inspiration pic for the Pin Sights Challenge. Maybe you should post this…” And so I’m happy to say I am firing on all cylinders! Thanks both sides of my brain, for showing up today! It can be a rare occasion sometimes!
